Monday, 27 October 2008

Painted Effect


Tested a different way to add the metal effect.
Spraying with black cellulose paint and then added metal powder while still wet.

Tried covering the test panel and sprinkling to test differences.
Gave some interesting effects, but the less dense the powder the harder it was to sprinkle.

Tried, brass, bronze, iron and aluminium....
Aluminium was the best overall, but the rest all have their own qualities but I wouldn't use this as an alternative to resin cast metal powders.

Might be useful when adding weathering or random details....

Sunday, 26 October 2008

Key Mould


Purpose
The key will be cast in metal powder with resin, it will consist of two parts and a small poor hole. With the quantities of metal powder I wish to use it will make the resins to viscous to poor, but with an open mould it can be brushed into key area's. Once near full the mould will be closed then topped up via the poor hole to ensure it is free of air voids.

1) Using a sheet of plastic (laser cut to shape) with locators added will be placed around the edge at the highest point where a split line can easily be removed. A clay wall will be added with various keys cut so it can locate to the fibre glass later. Silicone will be poured over to a thickness of 10mm, when near catalysed long cube like locator will be added to prevent the mould wall sinking in later.

2) Once fully catalysed clay wall is removed and fibre glass (or mod rock) jacket is added to strengthen the mould.

3) Mould is then flipped over and all plastic and excess material removed. New clay wall is made with keys and locators. A small object is added which will layer become the poor hole. Poor second half of silicone.

4) Remove all clay, and added the second half of the fibre glass jacket, remembering to added adequate release agent where fibre glass touches. Once catalysed drill holes for M6 bolt every 30mm around the edge.

Top image shows how the mould will look when open.
Detail shows how top locators will be pinned with metal rod to prevent the wall from sinking. This is an overly cautious method, but it will insure the surface of the key will not be warped when mould is moved.

Friday, 24 October 2008

Shiny Formers


Key
Finished and filled, there's something every model maker needs to learn and that's when to stop, being too particular will take for ever. The key has been given several layers of clear cellulose lacquer in a slight speckle. After 2 days to cure this will be polished back to give a good surface to mould from. The area's that are hard to polish will remain textured from the spray, mimicking the randomness of the stamped metal effect.

Fact -I discovered that to give a beaten affect to an object, brush and stipple wax into the mould. This is what was done on Gladiator so a single mould could be used to produce many helmet with different variations of damage....

LED
First post for the LED, turned on the lathe from chemi-wood, to an amazing finish then lacquered same as the key, and after a few days will be polished using T-cut to make a glass like surface. (also a few layers of Mirror Wax will maker the surface better and easier to de mould)

Contacted Mould life and Alchemy,

Alchemy's advice.
-3660 clear urethane slow, would be best for my LED casting with TRIA inks for the colour, costing £33.15 for the kilo kit. But still need to research the mould required, some urethane reactions are inhibited by tin cure silicones. May need a platinum silicone.

Mould Life advice
-Optic clear 31, mould life are particularly reliable when it comes to advice, and I have used their poly optics before. Will cost around £42 for the smallest kit and will require a Tinsel 40 mould costing around £30. Using TRIA inks for the colour.

ATM - cost is the main concern.....so it hangs on the 3660 mould requirements. TRIA inks cost around £5 a colour.....

CASTING ADVICE
-When using TRIA red ink into clear urethanes, always make it darker than you want when mixing, they lighten up when they curing
-Using standard urethane pigments with 3660 make it loose its transparency.

Weaving
In the image above I tested making a new weaving needle, meaning I could weave 3 stitches at the same time. This did not work, so back to one at a time.

-Note added new link to the giant magnetic letter I will be making.....

Sunday, 19 October 2008

Object Update

Weaving

With the new new board now filled, and with 2 and a half balls of twine gone, it takes roughly 6ish hours to complete just over a meter of cotton ribbon @ 14:1..


In to total the strap has 1442 stitches, which is now quite a scary thought, I have to make about 5 of these....

The Key
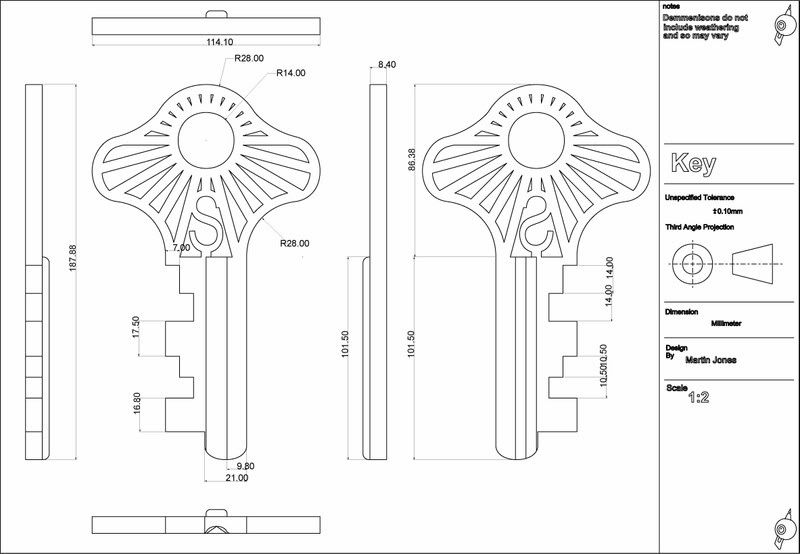
With it now sprayed and major details completed, it should be ready for moulding by Wednesday. All there is to do is refine some of the details and make some sharper edges.
-The mould will be made in two parts with the seam running along the top edge of the key making flashing easier to remove. With a nice mix of aluminium and iron powder a nice steal looking key will be produced with magnetic properties, making it attract to the back pack.


Things left to do

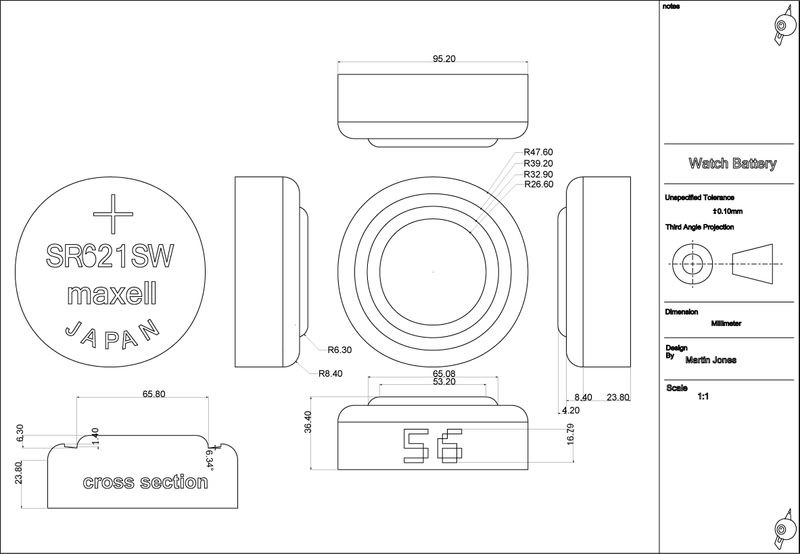
- Watch battery, still need to find some brass, copper or aluminium. No luck so far, if all else fails they will require a similar cold casting method, but without the preferred chrome effect.
-Decide what to cast LED from, currently considering clear fast cast from either alchemy or mould life.
-Need good large scale printers with flexible plastic capabilities

Note - added LED plans to links....

Wednesday, 15 October 2008

Weaving

Waeving

The various clothe that borrowers would be able to obtain would be mainly cheaper and most probably synthetic. Using a sample of cotton ribbon the plan was to scale up the material and its weaving pattern.


1. (using a sample as reference I experimented with weaving methods to best mimic the real thing) first test using string and card, this worked but the card was to flimsy meaning the weave could not be as tight as required. Once finished and removed from the board the pattern soon perished.

2. A thick laser cut board was then made, it was cut in half down the centre and a then glued back together. this was done so it could easily be dissembled later (so the weave could be removed intact). Also various tools were made from metal rod so that the weaving speed could be improve.

3.With the acrylics strength a thicker cord was used and a much better tighter weaving, but am limited by the boards length. discovered that with the weave touching the back of the board each stitch made it tighter making it harder to work with, so it needs to be raised from the back.

4. A meter and a half length board with wooden peg spacers was then made. Each peg is unglued, with a notch half way down, so the weave is made above the backboard. I can now spend my evening weaving the require amount of borrower material.

--Also Added new link list of plans and drawings---

Monday, 13 October 2008

Plans, materials and spray test

Spray testing

Continued experimenting with the ability to spray a convincing metallic surface.


Tested the following...
-Chrome plasti-kote spray, with cellulose lacquer and acrylic lacquer.
-aluminium metal powder resign sprayed - with with cellulose lacquer and acrylic lacquer.

So far, they all look metallic, but all retain that plastic like appearance, this kind of spray may not be useful.

Material Testing


Using samples of cord and ribbon, larger scales of weave were produced, using string to represent the thread. This was hand made to represent the fibres at the borrower scale.
worked very well, but the thickness may need to be increased to make a truer representation.

Using various plastics (bin liners), these were melted together to form plastic at the borrower scale, overall the plastic became around 2mm thick, this will be used in test to better understand possible ways of working with plastic at borrower scale.

The Plans are as follows

-Clothe, will be hand made from threads/rope etc.
-LED, cast in clear cast with metal interior components.
-Watch battery, hand made, from either aluminium, or chemi-wood with a metal spray application.
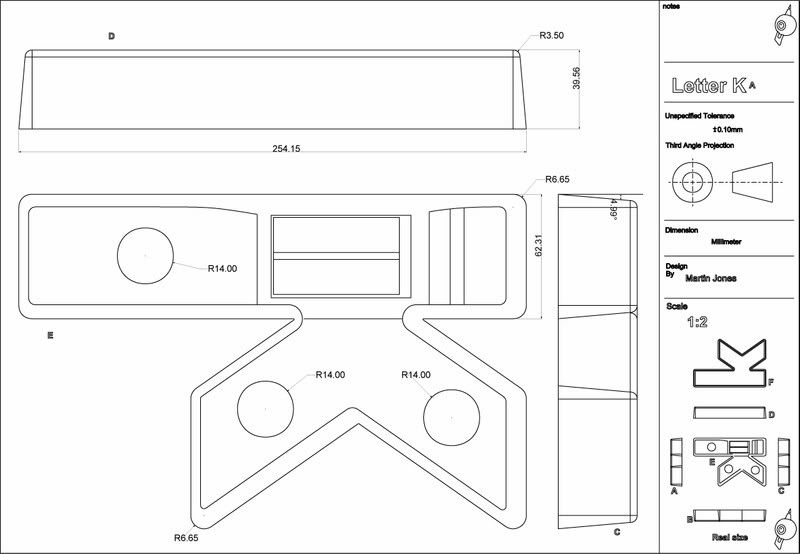
-Magnetic latter, made from wood or cheap acrylic (depends on weight) , then sprayed to mimic plastic.
-Key, laser cut from acrylic, hand finished and damaged then cast in resin with metal powder.
-Clasps and clips, made from steal to mimic staples.
-Various pockets, made from large scale prints onto plastics.
-Button (as time permits) turned, then airbrushed to a plastic effect.
Sunday, 12 October 2008

More Designs - and material descisions


Current Design

Several changes made so far, the back pack has become a magnetic letter mimic a more of a climbing harness. only issue is the available reference object only has a single magnet would prefer at least two making its use more practice.

Test and Source's

Pockets
- made from enlarged plastics.
- Need to find large scale printing with adequate plastic properties.
- Custom made plastic samples could be easily produced.

Magnetic Letter
- magnetic back pack
- reference has very very slight translucency, shall this be ignored (would light act in similar way at the required scale?)
-Test sprays on various materials is needed.

Straps
-Need to source real life objects as reference.
-Perhaps find 14:1 equivalent of thread, and make on straps though means of plating and weaving.
-Colour, perhaps dyed?

Watch battery
-to gain shininess, either hand made from steal or aluminium, or cast then chrome dipped.
-could be costly....