Thursday 18 December 2008

Photo's

Here are some final Images of the LED's and Key.


Saturday 29 November 2008

And its finished

Well The project is finished......


(Above) This is the best image so far of the back pack, better ones are on the way...Manages to get finished before deadline with an hour to spare and play about the studio in my equipment.

The magnet I ordered wasn't powerful enough to hold the Key, but any more Iron in the casting mixture would have effected the colour. There are much more powerful magnets available but in the interest of safety I decided against using one. The harness I weaved worked well, and was strapped togeather with large staples. But the finish on the 'K' was slightly rushed for deadline.... I will re visit it later to respray.....

The Best part.....


Here is a nice photograph of one of may lamps. I find the scale to be most pleasing, I would like to produce one at 1:1 using the real objects to test how convincing this version is....

All that is left to do is my critique which I am planning this very second...... Better photographs will appear soon.......

-thanks

Tuesday 25 November 2008

Nearing The Finish...

Object Updates.....With originals
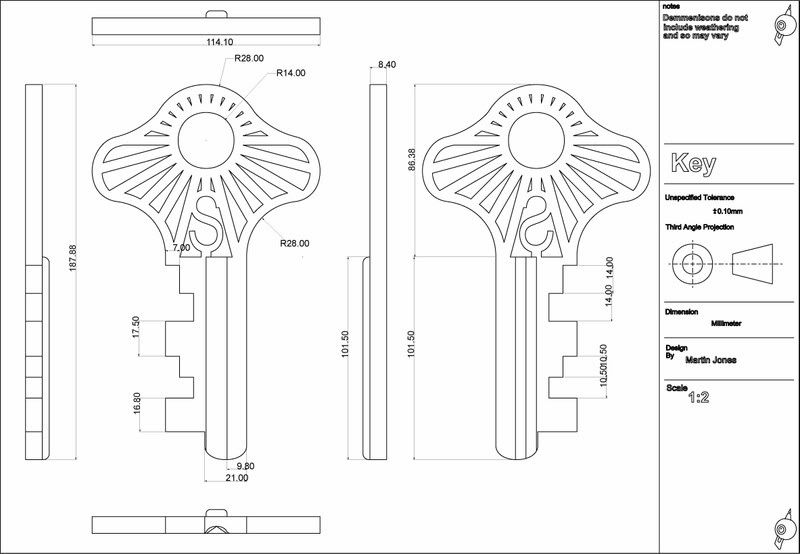
1) Key


Overtime, the aluminium has dulled slightly, so just before my critique next week a polish is in order.... But overall this object have been very successful...
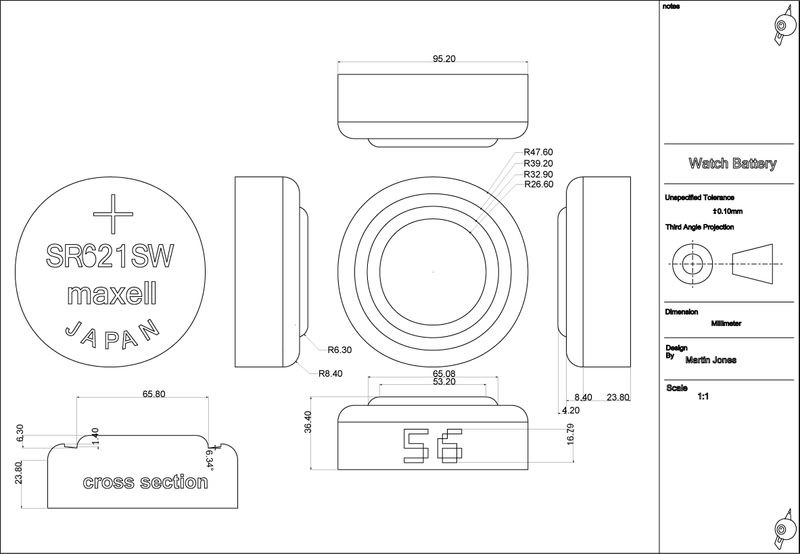
2) Watch Battery


I've had quite a bit of practise with aluminium metal powders, but these are by far the best. results. The only problem I have been finding is slight blemishes where the resin is perhaps not mixed perfectly. If there's time a few more will be cast to remove the slight marble effect on some of the edges. The main discovery is that Gel coat isn't not recommended, its viscosity means less metal powder can be used dulling its effectiveness.
"original at the bottom is hard to see".

3) L.E.D's


These have proven difficult, due mainly to the end line approaching (Friday).

->My first cast (Red) had an odd surface blemish which looks like an odd vein like ripple effect. It was probably due to the resin thickness and the heat it would have been holding. This was easily sanded away but more polish is require to achieve translucency. (also some air was trapped around the filiment).

--> My Second Cast (Green)In order to cut down this ripple effect, I mixed the poly urethane coloured it then added to the mould and degassed them together. This was left overnight to cure naturally without heat, then baked at 60 degrees to finished the curing. It was blemish free but there were air bubble at the bottom of the mould.

---> My Third and Final Cast (Yellow) this time, The resin was not degassed in the mould but seperately and the resin was cured at 30 degress for 3 hours (instead of 60 for 1 hour) This is now been left in the oven to cool overnight. On inspection this cast looked very sucessful (will post again tomorrow)
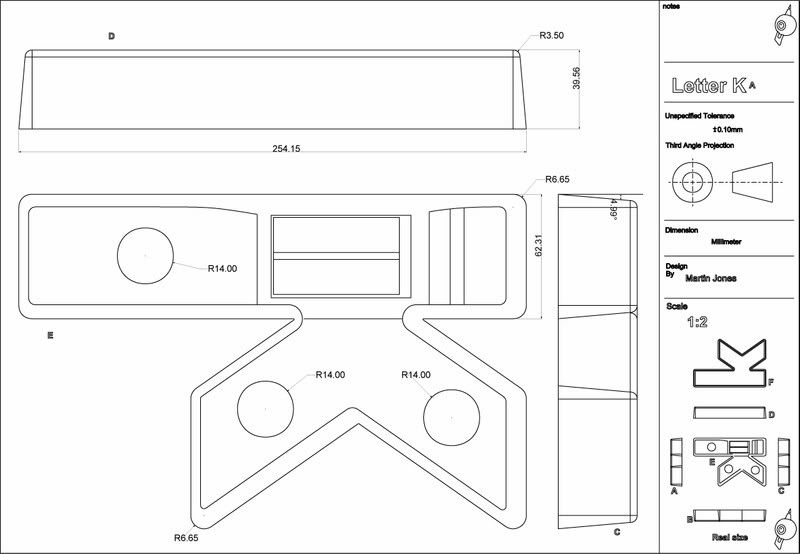
4) Weaving + Letter K

The 'k' has been cut out and built (also learnt to sue the router today to add even chamfer) ready for final details and spraying.

Modified my weave types am running tests to see how bleaching will change the threads whiteness to appear more cotton like.

5) Final thoughts and plan

Wednesday - LED's finished and attached to watch battery, 'K' primed at least
Thursday - Spray K Yellow, Darked matt yellow, then lightened sparked satin yellow, final coat of a tinted yellow gloss... Begin assembly.
friday - final assembly and well earned Pint...or five...

Saturday 22 November 2008

Battery Completed


Here's an image of the battery from start to finish.
1) Nice silicone moulds
2) Straight out of the mould
3) Tidied Up
4) Polished.....

The battery worked very well, usually you need to burnish back resin with iron wool to gain the metallic finish but it was unnecessary. I found that the key things to remember when using metal powders is that.

1- The master should be polished to a very high standard (near mirror like), either lacquered or turned from a plastic or metal.
2- Resin Gel coated should be used, standard laying up resin works much better, you can have a higher ratio of metal powder to resin and will thicken to a gel coat standard because of it. Giving you a better metal effect.
3- Added a greenish off-white pigment to the resin give the aluminium that something extra...

Other objects

LED - Internal filaments have been made from acrylic and have been sprayed and lacquered. Ready for mould on monday morening.
Letter K - Basic shape has been cut ready to be sanded and shaped.

Saturday 15 November 2008

Moulds and Clear Cast 31

Finished polishing..... finally


The battery has been moulded, (moulds above) and have been poured ready to cast on Monday.
The idea for the batteries is to cast them in fibre glass with a metal powder gel coat.
--Decision being, what when I made the key the highly polished surface lent its shininess to the aluminium powder. Gaining a better aluminium look..... So these formers where polished even better than the key was....

Optic Clear 31


Using some left over blanks for acrylic eyes I made this test mould for the optic clear 31 using transil silicone.

Using about 16g of resin each and 1 drop of the tria inks I got the test above. With only 1 problem. Where what looks like air bubbles have formed with an odd gas like pattern around them. The only thing I think might have caused this is some kind of forign chemical. So after cleaning the mould with alcohol I recast them. The problem was reduced but still slughtly visable.

Have now filled moulds with fast cast to try and remove anything left in the moulds. Other than that the colour is looking amazing......

Wednesday 12 November 2008

Battery / Weaving Update

Battery Is almost ready to mould.....


The lathed battery parts had laser cut detail added. The text in the real object would have been stamped, so with any luck during the spraying stage the edges will become slightly filled producing a mild radius.

They have been sprayed with 5 layers of Cellulose lacquered near flawlessly.... The only flaw was major and in the final coat. On the last stroke I added to much and it pooled in one area..... This area will now required more time to set giving me another day to wait till I can polish them....... Damn it......

-------Was taught to make samurai sandals today, forgot the correct Japanese name, but will add later....Very useful in my weaving techniques possibility of modifying the design to make some sort of binding cords for my LED's to Batteries...

Tuesday 11 November 2008

Pulled Key and moulded L--E--D


Here is the key, it turned out better than I thought it would, and OK in other ways.
They effect I managed to get with the aluminium worked very very well.
--It polished up very nicely to a shiny finish giving me the idea to not chrome the watch batteries and to try this....

My test objects never polished this well many dude to there surface. the key however was lacquered and polished to a high degree.


Poured the mould for the LED, used 450 grams of expensive platinum silicone to make it, as well as a few sample moulds. The silicone is clear designed for casting toys, using a clear cup to make the mould wall means I can still see the object inside.......

In 24 hours the coloured resin can begin.... wahahahaha